
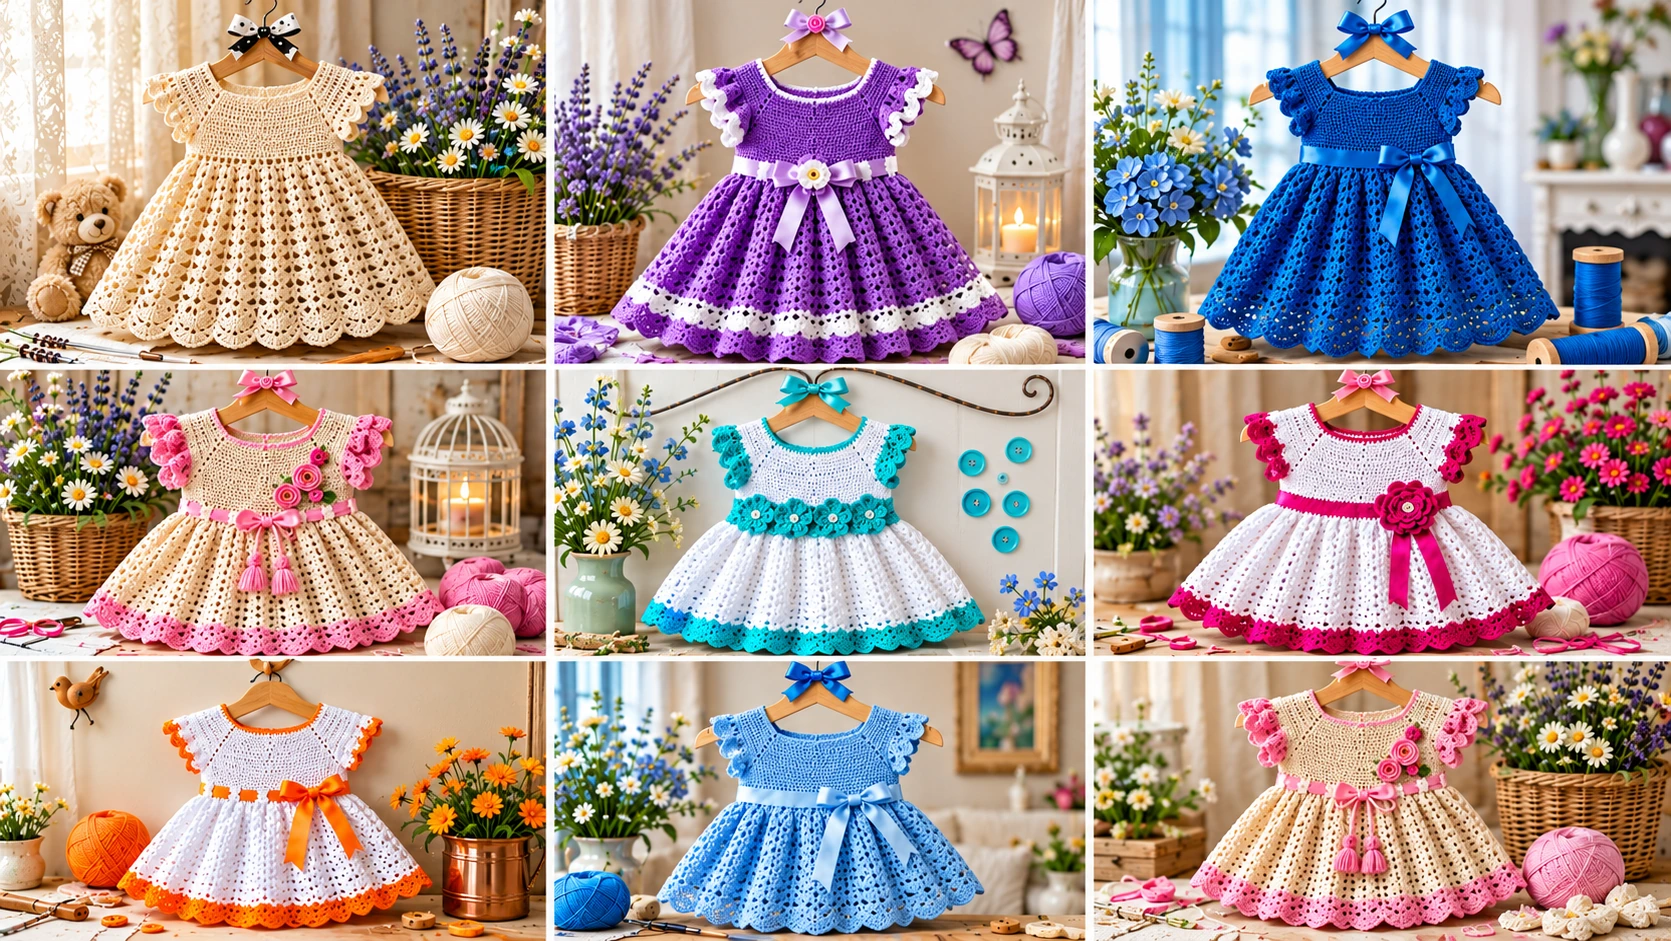
If you are searching for crochet ideas that you can actually turn into finished projects, this guide is designed as a working design resource—not just a gallery. We will break down eight baby-dress silhouettes, show how to choose yarn and hook size, explain the logic behind a top-down yoke, walk through skirt shaping and scalloped edging, and give you practical ways to adapt each idea to your own gauge and skill level.
Whether you are making your first garment or you have been crocheting for decades, the goal is the same: understand why a design works so you can reproduce the look, adjust the fit, and create your own version instead of following inspiration blindly.
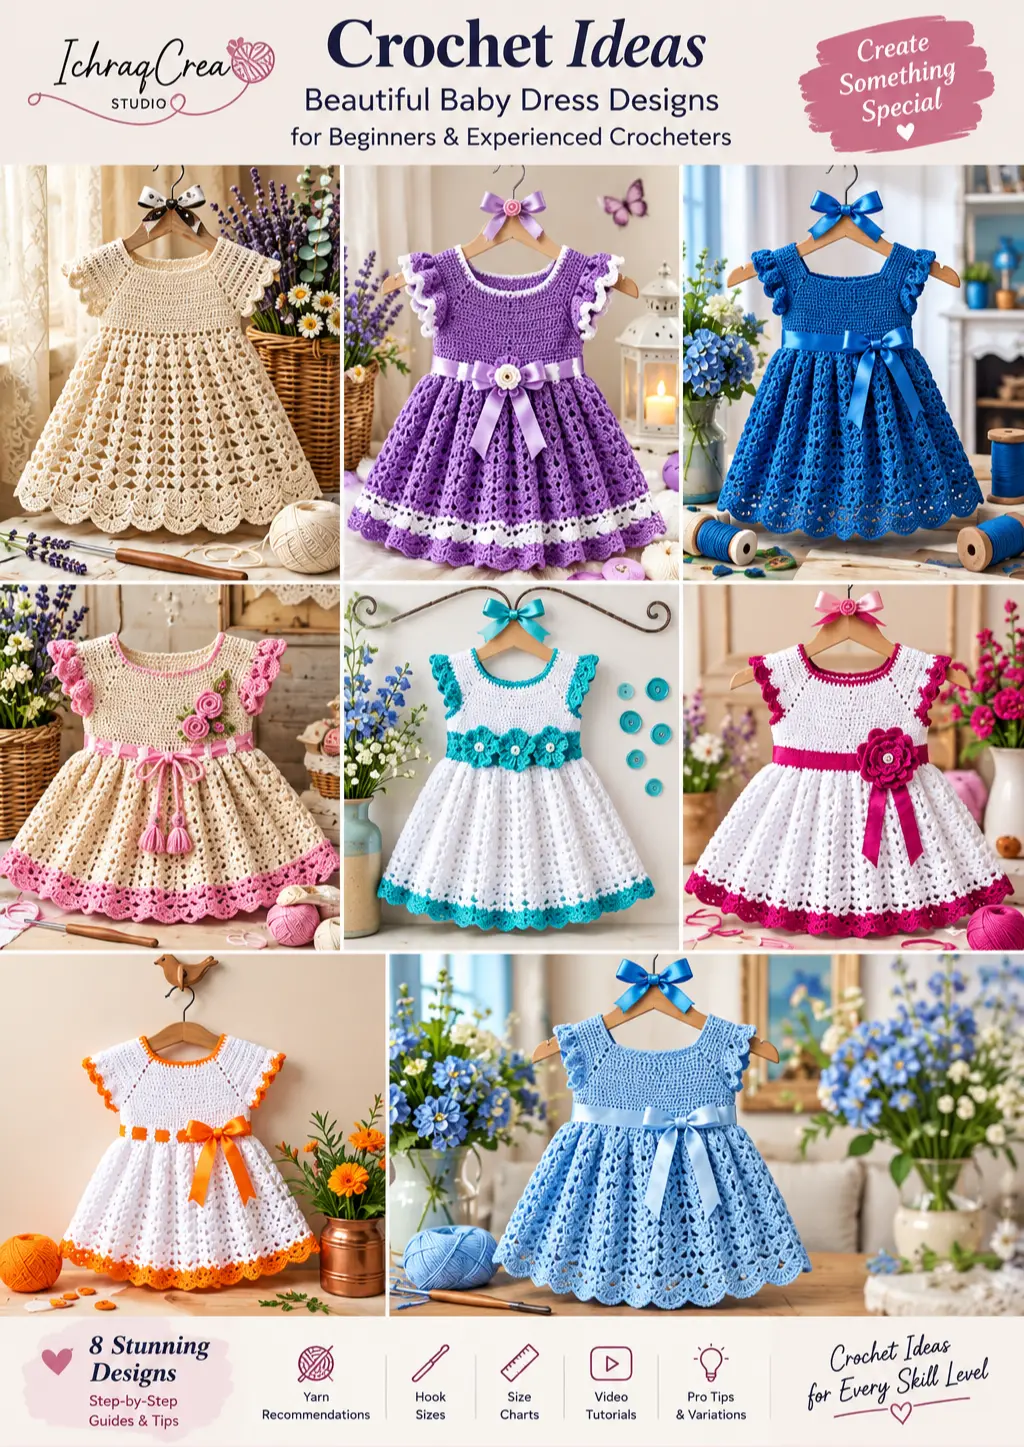
The collection above is the visual starting point for the eight dress designs featured in this guide.
What Makes a Crochet Idea Worth Making?
A good crochet idea gives you more than a pretty picture. It gives you a clear path from yarn to finished object. For a wearable baby dress, that path includes the yarn fiber, gauge, bodice construction, armhole depth, skirt expansion, finishing method, and the practical question of how the garment will be washed and worn.
That is why the eight designs in this collection are useful as design blueprints. They share a common garment logic—structured upper section, shaped skirt, decorative border—but each changes the visual language through color, sleeve treatment, lace density, flowers, bows, or hem detail.
Experienced-maker rule: treat the photographs as a design brief. Start with gauge and measurements, then translate the visual proportions into your own stitch counts. This is safer than assuming that a stitch count from one yarn and hook combination will behave the same way with another.
Yarn, Hook Size, Gauge and Tools for Crochet Baby Dresses
The most beautiful crochet ideas can become frustrating if the yarn and hook are chosen only for color. For garments, fiber behavior matters because it changes drape, stitch definition, weight, stretch, and washing performance.
| Yarn choice | What it does | Good use | Watch for |
|---|---|---|---|
| 100% cotton | Defined stitches, stable fabric, crisp edges | Structured yokes, summer dresses, heirloom looks | Can feel heavier and less elastic |
| Cotton/bamboo blend | Soft hand and fluid drape | Flutter sleeves, flowing skirts, delicate dresses | May grow with moisture; swatch before sizing |
| Anti-pilling baby acrylic | Light, resilient and easy-care | Everyday baby garments and washable projects | Choose a soft baby-friendly quality rather than a scratchy acrylic |
Gauge is the bridge between an idea and a real garment
If a pattern or design gives a finished chest measurement, your gauge determines whether your stitches actually produce that measurement. Make a swatch using the same yarn, hook and stitch combination you will use in the garment. Wash or wet-block the swatch if the finished garment will be washed, then measure again after it dries.
A simple working formula is:
Stitches needed ≈ target width × stitches per inchFor example, if your swatch gives 5 stitches per inch and your target bodice width is 8 inches, the starting framework is about 40 stitches. You then adjust for the stitch repeat, edge stitches and construction method. The number is a planning tool—not a substitute for checking the actual garment measurements.
Choosing the hook
A smaller hook usually produces a denser fabric; a larger hook usually produces a more open and fluid fabric. Neither is automatically better. For a baby dress, the correct choice is the one that gives the required fabric behavior and the required gauge.
- Use the yarn label as a starting point, not as a final answer.
- Make a gauge swatch before committing to the full yoke.
- For lace or openwork skirts, check that the fabric does not become so loose that the garment loses its shape.
- For a structured bodice, avoid a hook that makes the fabric stiff and uncomfortable.
Top-Down Yoke: The Crochet Ideas Blueprint Behind These Dresses
A top-down yoke is one of the most useful garment structures for crocheters because you can test the fit before spending hours on the skirt. A classic square yoke uses four expansion points. The corners create the width needed for the front, back and armhole areas.
Start with the geometry, then let your gauge decide the numbers
This framework uses four corner expansion points and a simple corner repeat such as 1 dc, ch 2, 1 dc. The important concept is not memorizing one chain count. It is understanding that every round must distribute growth consistently at the four corners.
A useful planning framework is:
- Back: roughly one quarter of the initial distribution, divided across the two back sides when the construction requires a back opening.
- Left armhole: roughly one quarter.
- Front: roughly one quarter.
- Right armhole: roughly one quarter.
These percentages are a starting geometry, not a universal baby-size formula. Your stitch multiple, neckline shape, yarn thickness and desired ease all change the final stitch count.
Worked example: a 6–12 month dress
Here is the whole calculation for a 6–12 month dress in DK cotton at 5 dc per inch. Use the same logic with your own gauge and measurements.
- Finished chest: body chest 18 in + 1 in ease = 19 in. At 5 stitches per inch that is 95, rounded to 96 so it divides by 6 for the shell skirt.
- Split of the 96 stitches at the underarm: front 42, back 42, and 6 chains under each arm (12 total).
- Armhole opening: about 7.5 in around, roughly 37 stitches. Subtract the 6 underarm chains and each sleeve section holds about 31 stitches.
- Yoke total just before the split: 42 + 42 + 31 + 31 = 146 stitches. Check: 146 − 62 skipped + 12 chains = 96.
- Growing the yoke: begin with about 70 stitches at the neckline and work
1 dc, ch 2, 1 dcin each of the four corner spaces every round. That adds 8 stitches per round. Repeat until you reach 146, then work 3–4 even rounds until the yoke measures 4.5 in from the neckline. - Split: work across the front, chain 6, skip the sleeve stitches, work across the back, chain 6, skip the other sleeve, and join. You now have a 96-stitch body ready for the skirt.
How to know when the yoke is deep enough
Do not rely only on round count. Measure from the neckline toward the underarm and compare the garment against the intended armhole depth. For a baby garment, the bodice should allow movement without pulling across the chest or cutting into the underarm.
8 Crochet Baby Dress Ideas: Design Breakdown
These eight models are the practical visual core of the article. Use each as a starting point and then adjust the colors, sleeves, neckline, skirt stitch and border to create your own version.
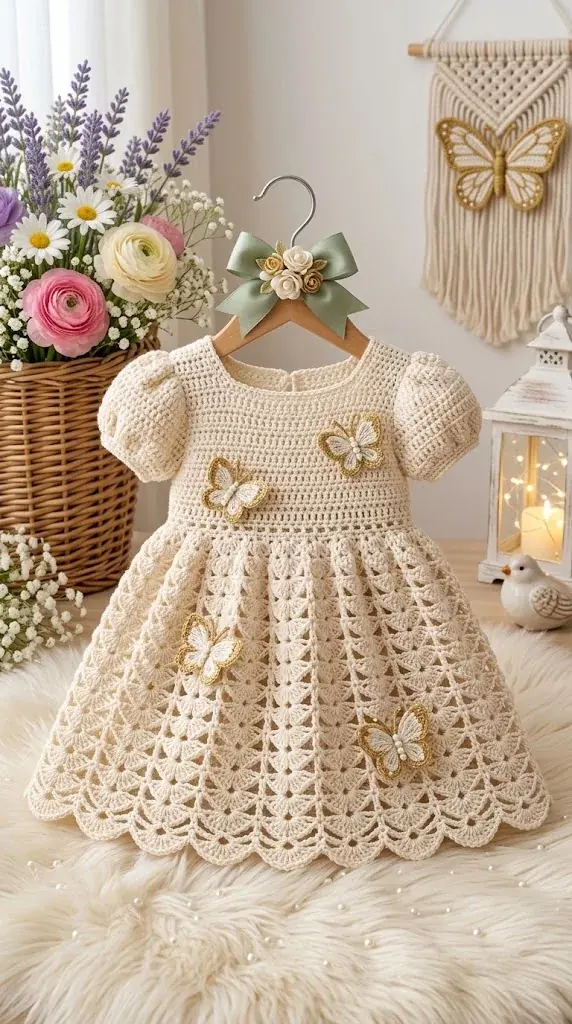
1. Cream Butterfly Heirloom Dress
This cream design uses puff sleeves, a lace-rich skirt and butterfly motifs. It has the visual character of an heirloom garment and demonstrates how appliques can become part of the design language rather than an afterthought.
Make it easier: replace the butterfly motifs with simple crocheted flowers.
Make it advanced: work the butterfly motifs separately, block them, and attach them only after the dress is fully finished so their placement can be adjusted.
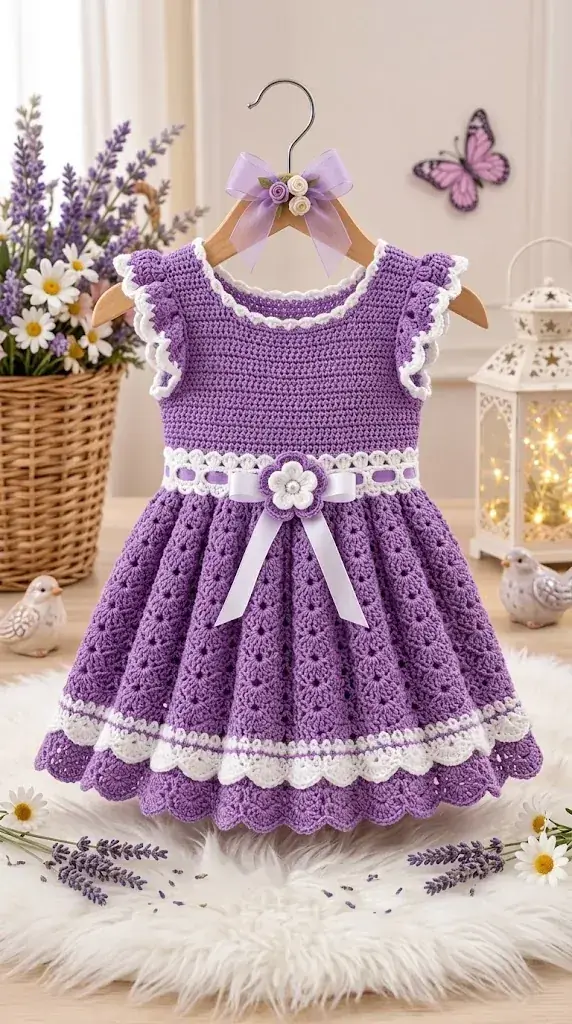
2. Purple Flutter-Sleeve Dress
The ruffled sleeves and layered hem give this dress a decorative, boutique-inspired finish. White edging creates separation between the purple sections.
Beginner approach: make the sleeves as simple ruffles rather than multi-row lace.
Advanced approach: coordinate the sleeve ruffle repeat with the skirt repeat so the whole garment shares one visual rhythm.
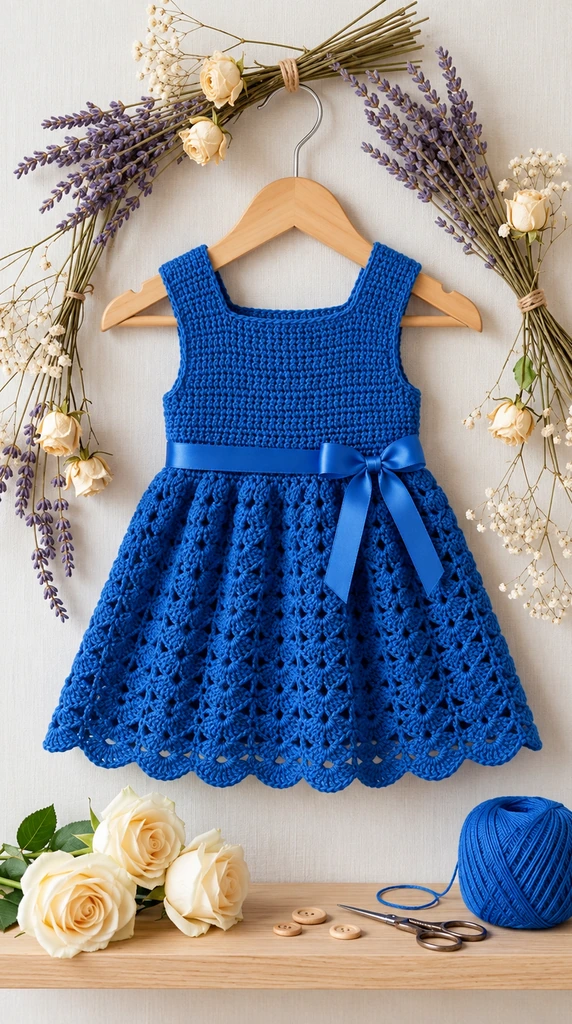
3. Royal Blue Openwork Dress
The saturated blue makes the openwork skirt the main feature. A solid upper section gives the lace room to stand out, while the scalloped edge creates a clean visual finish.
Construction lesson: changing stitch density between bodice and skirt can create a strong silhouette without complicated shaping.
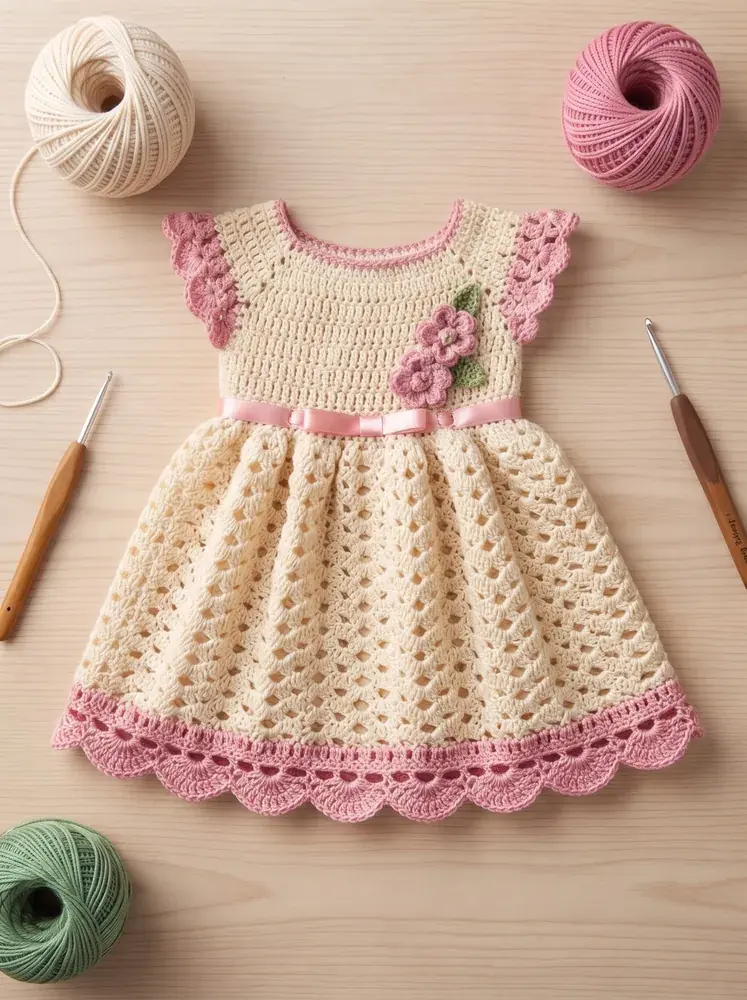
4. Cream and Dusty Pink Floral Dress
The soft palette and floral details create a romantic look. The lace skirt is the star, while the pink sleeve and hem details frame it.
Advanced lesson: when a skirt pattern has a strong repeat, calculate the circumference so the repeat finishes cleanly instead of forcing a partial motif at the side seam.
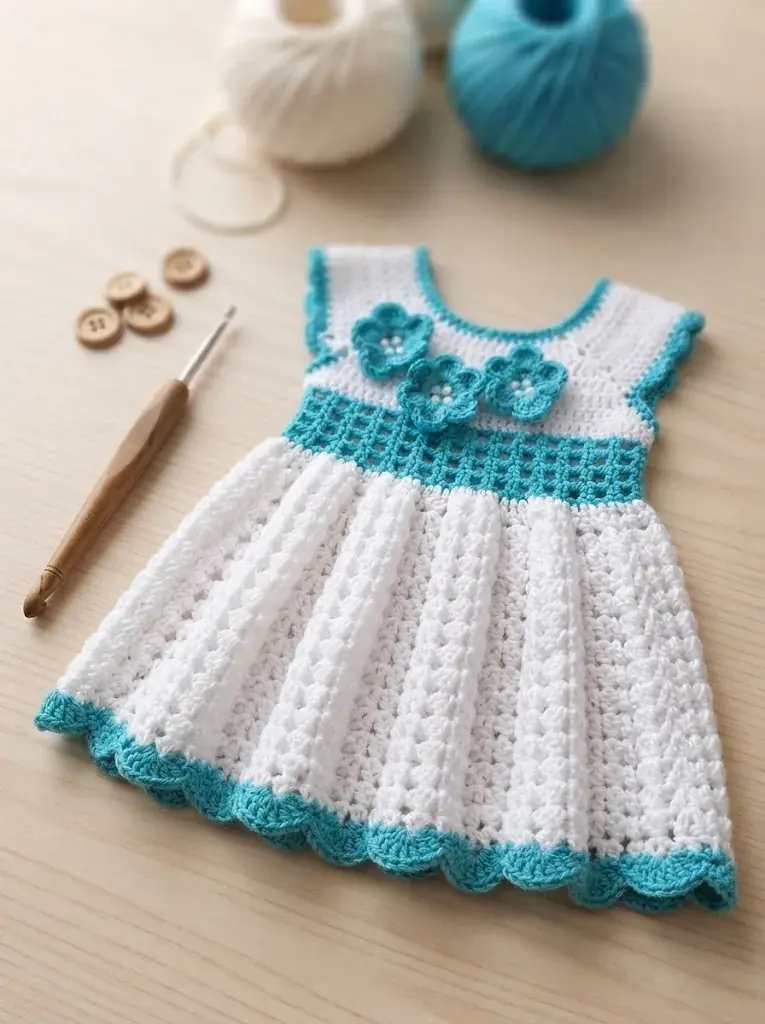
5. Turquoise Flower Dress
Turquoise edging and flower motifs turn a mostly white dress into a fresh, high-contrast design. The horizontal turquoise band is particularly useful for visually separating the bodice from the skirt.
Safety: replace pearl flower centers with French knots for babies under 3.
Beginner approach: use a basic bodice and repeat one skirt stitch throughout.
Advanced approach: create a denser bodice and transition into an open lace stitch at the waist.
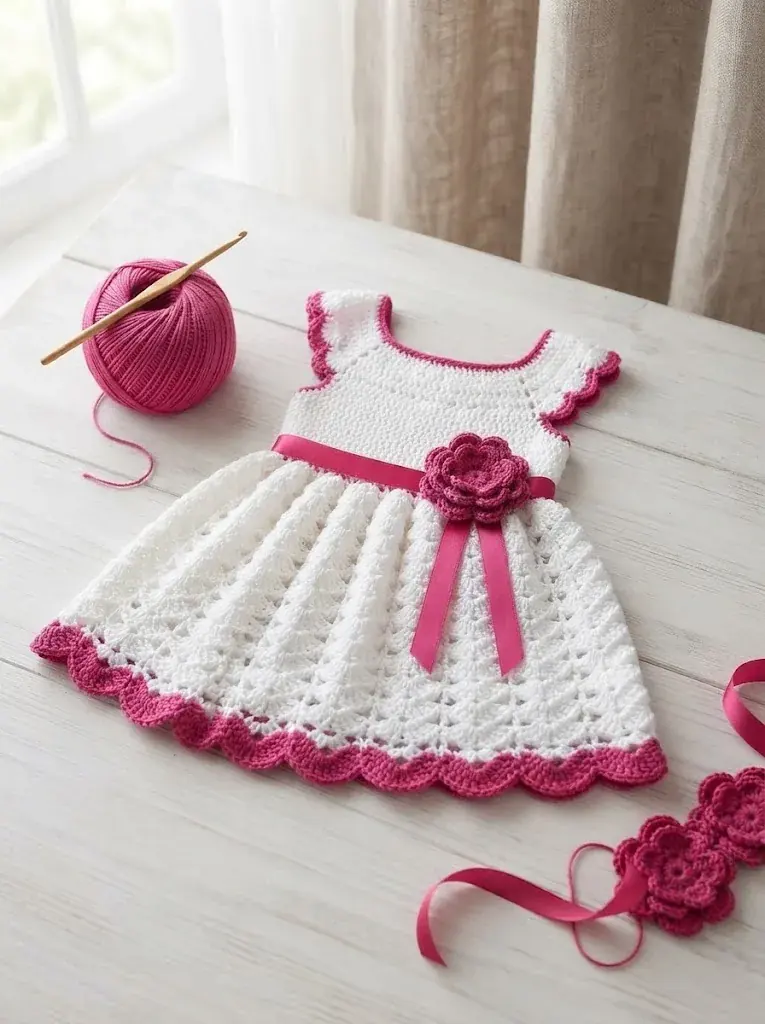
6. Fuchsia and White Flower Dress
This design uses a strong pink trim, a waist flower and a ribbon to create a simple focal point. It is a good example of how one accent color can transform a neutral crochet fabric.
Design tip: if the skirt is already textured, keep the accessories simple so the dress does not become visually crowded.
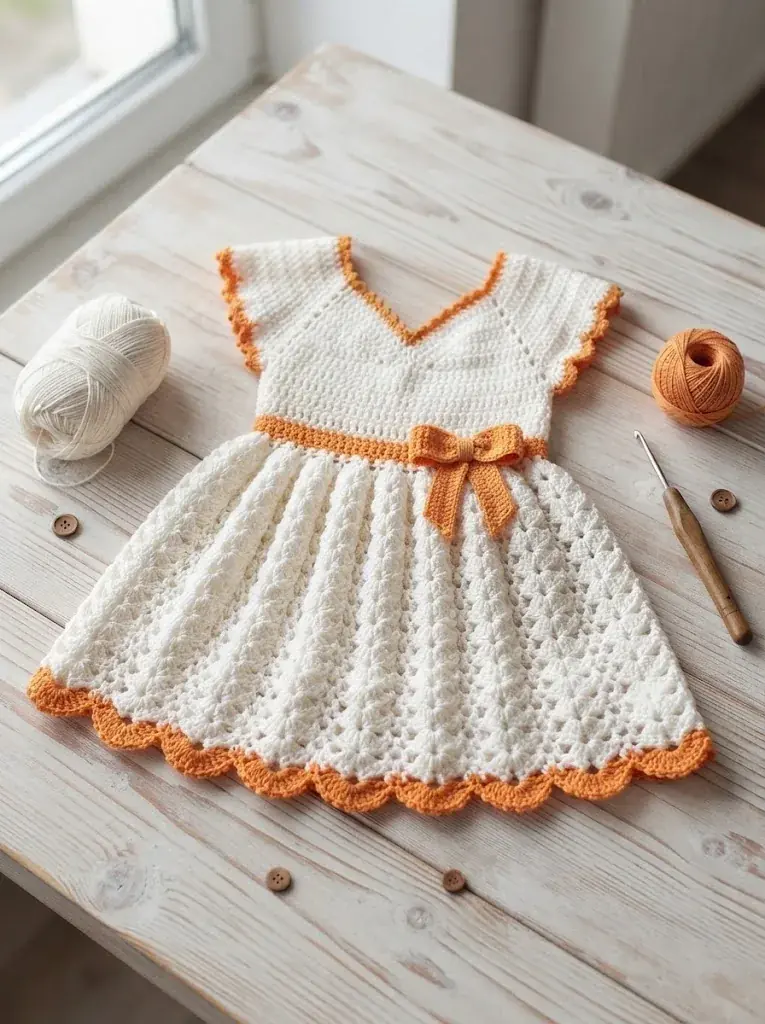
7. Orange-Trimmed Classic Dress
The white-and-orange combination makes the stitch texture easy to see. The design uses a relatively simple bodice, a textured vertical skirt and a small waist bow. It is a useful beginner-friendly concept because the color changes create visual interest without requiring complicated colorwork.
Make it easier: keep the bodice in one stitch and use the contrast only on the neckline, sleeve edge and hem.
Make it advanced: introduce a lace panel into every second skirt section and keep the orange only for the finishing rounds.
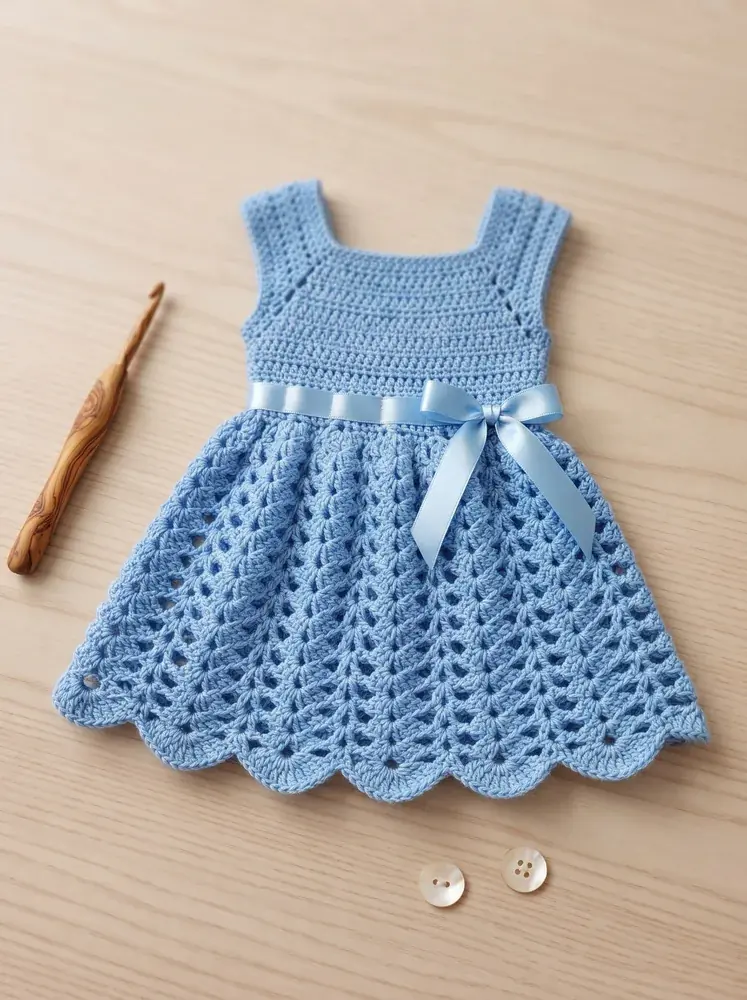
8. Sky Blue Ribbon Sundress
The sky-blue version is a clean example of a sleeveless silhouette with a ribbon waist and open skirt. It can be adapted easily to different color palettes.
Beginner approach: keep the neckline and armholes simple and concentrate on an even skirt repeat.
Advanced approach: add a subtle eyelet band above the skirt to create a deliberate transition from solid to lace.
25+ Crochet Ideas You Can Create From These 8 Dress Designs
You do not need 25 completely different patterns to get 25 different design directions. A single well-fitting base dress can become many distinct crochet ideas by changing one or two variables at a time. Here are more than 25 practical variations you can use for your own design notebook.
| # | Idea | Change | Skill focus |
|---|---|---|---|
| 1 | Classic white heirloom dress | White cotton + scalloped hem | Beginner |
| 2 | Lavender flutter-sleeve dress | Add ruffled sleeves | Beginner–Intermediate |
| 3 | Royal blue lace dress | Openwork skirt | Intermediate |
| 4 | Turquoise flower dress | Contrast band + appliques | Beginner–Intermediate |
| 5 | Pink ribbon party dress | Ribbon waist + flower | Beginner |
| 6 | Butterfly heirloom dress | Butterfly appliques | Intermediate |
| 7 | Dusty rose floral dress | Soft pink edging + flowers | Intermediate |
| 8 | Sky blue summer dress | Sleeveless + eyelet waist | Beginner–Intermediate |
| 9 | Peach and cream dress | Replace orange with peach | Beginner |
| 10 | Sage and ivory dress | Muted green trim | Beginner |
| 11 | Blush baby shower dress | All-over blush accents | Beginner |
| 12 | Vintage blue dress | Blue cotton + white edging | Beginner |
| 13 | Garden party dress | Flower motifs on the bodice | Intermediate |
| 14 | Butterfly garden dress | Butterfly appliques on the skirt | Intermediate |
| 15 | Simple newborn dress | Reduce decoration and use a soft stitch | Beginner |
| 16 | First birthday dress | Statement trim + ribbon | Beginner–Intermediate |
| 17 | Christening-inspired dress | Ivory palette + lace | Intermediate |
| 18 | Photo-session dress | High-contrast border and bow | Beginner |
| 19 | Summer cotton sundress | Openwork skirt + sleeveless yoke | Intermediate |
| 20 | Heirloom keepsake dress | Fine cotton + careful blocking | Advanced |
| 21 | Two-tone boutique dress | One main color + one border color | Beginner |
| 22 | Scalloped shell dress | Make the hem the focal point | Intermediate |
| 23 | Flower-garden dress | Three-dimensional flower accents | Intermediate |
| 24 | Minimal modern dress | One color, clean neckline, simple hem | Beginner |
| 25 | Vintage lace dress | Openwork skirt + shell border | Intermediate |
| 26 | Signature Ichraq Crea variation | Combine your preferred yoke, skirt and border | Advanced |
Ideas 9–26 explained
9. Peach and Cream Dress
Take the orange-trimmed dress (idea 7) and replace the orange with soft peach. Keep the V-neck and cream body. Peach photographs warmly and suits newborn to 6 months.
10. Sage and Ivory Dress
Ivory body with sage green edging on neck, sleeves and hem, plus two small leaf appliqués. A muted palette that suits any baby and any season.
11. Blush Baby Shower Dress
One blush shade with an ivory picot hem. Make it in 3–6 or 6–9 months, since newborn sizes are outgrown within weeks.
12. Vintage Blue Dress
Blue cotton body with white picot edging on neck, sleeves and hem. Add three white stripe rounds above the hem for a nautical look, and embroider a small anchor instead of sewing on a button.
13. Garden Party Dress
Place three flat flowers with leaves diagonally across the yoke. Flat motifs lie comfortably against a baby’s chest and can be sewn on after blocking.
14. Butterfly Garden Dress
Scatter four to six butterflies in different pastel shades across the skirt. Sew them down at the body only so the wings stay free.
15. Simple Newborn Dress
Skip the trims: cotton-bamboo yarn, cap sleeves, a wide back opening with a single crocheted button loop and a plain shell skirt. Soft, light and quick to make.
16. First Birthday Dress
A bold trim color and a full skirt (flare twice, see the shell skirt recipe below) with a ribbon sewn in at the waist. Choose machine-washable yarn for cake-smash day.
17. Christening-Inspired Dress
Ivory fine cotton, 2–3 in longer than the size chart, with a lace mesh hem and ribbon threaded through an eyelet waist. Keep every decoration flat and secure.
18. Photo-Session Dress
Choose a border color that pops against your backdrop and sew the bow flat so the baby can lie comfortably on their back.
19. Summer Cotton Sundress
A sleeveless square yoke with an open shell skirt in lightweight cotton. Add tie straps sewn to the yoke for adjustable fit.
20. Heirloom Keepsake Dress
Work in fine cotton thread with a small hook (about 1.75–2.25 mm) for a delicate fabric that lasts for generations. Store it flat in acid-free tissue.
21. Two-Tone Boutique Dress
One main color and one border color, with the contrast repeated on neckline, waist and hem. The easiest way to make a dress look professionally designed.
22. Scalloped Shell Dress
Make the hem the star: work three graduated scallop rounds (5-dc, 7-dc, 9-dc fans) in a slightly darker shade to create depth.
23. Flower-Garden Dress
Cluster five to seven 3D flowers of different sizes around one shoulder, with leaves. Sew each flower down with yarn and reinforce the stitching.
24. Minimal Modern Dress
One neutral color, a clean neckline and a straight A-line skirt in simple double crochet, with a half double crochet waistband worked in back loops for a ribbed look.
25. Vintage Lace Dress
Replace the shell skirt with filet mesh worked as diamonds from a chart, then finish with the scalloped fan hem. Requires careful counting.
26. Signature Ichraq Crea Variation
Choose one yoke, one skirt and one border from this guide and write down your gauge and stitch counts. That record becomes your own reusable pattern.
The important lesson is that crochet ideas become original designs when you change construction deliberately. Keep notes on your gauge, stitch repeat, yoke depth, skirt circumference and finishing rounds. Your notebook then becomes a reusable design system instead of a collection of disconnected projects.
Baby Dress Sizing: Use Measurements, Not Age Alone
Age labels are convenient, but babies do not all have the same proportions. For a better fit, measure the child whenever possible and compare the measurement to your swatch gauge.
| Reference size | Chest circumference | Approx. yoke armhole depth | Approx. finished length | Starting yardage range (DK) |
|---|---|---|---|---|
| Preemie | 13–14 in (33–35 cm) | 3.0 in (7.5 cm) | 10–11 in (25–28 cm) | 120–180 yd |
| 0–3 months | 15–16 in (38–40 cm) | 3.5 in (9 cm) | 12–13 in (30–33 cm) | 150–220 yd |
| 3–6 months | 16–17 in (41–43 cm) | 3.5–4.0 in (9–10 cm) | 12–14 in (30–35 cm) | 200–300 yd |
| 6–12 months | 17–18 in (43–46 cm) | 4.0–4.5 in (10–11.5 cm) | 14–16 in (35–40 cm) | 250–400 yd |
| 12–18 months | 18–19 in (46–48 cm) | 4.5–5.0 in (11.5–12.5 cm) | 16–18 in (40–45 cm) | 350–500 yd |
| 18–24 months | 19–20 in (48–51 cm) | 5.0–5.5 in (12.5–14 cm) | 18–20 in (45–50 cm) | 400–550 yd |
These are body measurements: add 1–2 in of ease for the finished chest. They are planning references, not a substitute for measuring the intended wearer, and you can compare them with the standard body measurement charts from the Craft Yarn Council. Yardage changes substantially with yarn weight, hook size, stitch pattern, skirt fullness and sleeve design.
Ease: the small measurement that changes everything
A dress that exactly matches body circumference can feel restrictive. A dress with excessive ease can slide around the shoulders. Decide how much movement and layering you want, then build that ease into the finished measurements.
Beginner Crochet Stitches and Advanced Details
Single crochet
Single crochet is excellent for dense sections, edging, small structural areas and clean borders. It is also one of the first stitches to master if you are following the Ultimate Beginner Crochet Guide.
Double crochet
Double crochet builds fabric quickly and works especially well in yokes and open skirts. It also makes increases easy to see, which is useful when learning garment construction.
Shell and fan stitches
Shells and fans create decorative fullness without requiring complicated shaping. They are especially effective at hems because the repeated groups naturally form scallops.
Openwork and eyelets
Openwork can make a skirt lighter and more fluid. For beginners, the key is to count the repeat carefully. For advanced crocheters, the interesting part is planning the circumference so the repeat closes neatly around the garment.
Appliques, flowers and butterflies
Three-dimensional motifs are a simple way to personalize a basic dress. Block the motifs separately when necessary, then position them visually before permanently sewing them down.
How to Build a Crochet Dress Skirt That Actually Hangs Well
Once the yoke fits, the skirt is where the visual personality of your crochet idea appears. A skirt can be dense and structured, softly textured, or open and lace-like. The most important technical principle is controlled expansion.
Option 1: Straight stitch repeat
Continue a stitch pattern around the body with minimal increases. This gives a straighter silhouette and is useful for simple dresses.
Option 2: Regular increases
Add increases at planned intervals to create a gentle flare. Record exactly where you place them so the skirt remains symmetrical.
Option 3: Shell expansion
Use shells or V-stitches and increase the number of shells gradually. This is effective for lace skirts because the increase can be integrated into the stitch repeat.
Shell skirt recipe (multiple of 6 stitches)
Round 1: ch 1, *sc in next st, skip 2 sts, 5 dc in next st, skip 2 sts; repeat from * around. Join with sl st to first sc.
Round 2: sl st across to the center dc of the first shell, ch 1, sc in same st, *5 dc in next sc, sc in center dc of next shell; repeat from * around, ending with 5 dc in the last sc. Join with sl st.
Rounds 3+: repeat Round 2 until the skirt reaches the length in the size chart.
To flare: in one round, work 7 dc instead of 5 dc in each sc. Each repeat grows from 6 to 8 stitches, about 33% wider. Do it once (around round 4) for a gentle A-line, and again around round 10 for a full party skirt.
How much fullness?
There is no single correct fullness. A narrow skirt uses less yarn and looks cleaner; a very full skirt creates a dramatic heirloom silhouette but adds weight. If you are designing for a baby, consider the weight of the finished garment as well as its appearance.
Signature Scalloped Fan Hem: A Simple Decorative Recipe
A scalloped fan border is one of the easiest ways to give a crochet dress a finished, boutique-style edge. The following recipe is a decorative framework. Test it on your actual stitch count before applying it to the full garment.
Round 1 – Mesh base (multiple of 6 stitches):
*dc 1, ch 2, skip 2 sts, sc 1, ch 2, skip 2 sts; repeat from * around.
Join with a slip stitch.

Round 2 – Fan shells:
*Work 7 dc into the next ch-2 space, sc 1 in the following ch-2 space;
repeat from * around.
Join and weave in ends.
If the fan repeat does not close evenly, do not force the last repeat. Adjust the mesh spacing or stitch count before beginning the decorative round. A clean repeat is more important than preserving an arbitrary number of stitches.
Baby Safety Rules for Crochet Garments
A baby dress must be beautiful and safe. Follow these rules for every idea in this guide.
- Avoid small parts for children under 3. Buttons, beads and pearls can detach and become choking hazards. Sew them on with doubled thread, or use embroidered French knots instead. See the U.S. Consumer Product Safety Commission for small-parts guidance.
- Keep ribbons short and sewn in. Stitch ribbon ends into the seam instead of leaving long loose ties.
- No drawstrings or long ties at the neck.
- Check the inside. Weave every end in for at least 2 in and make sure nothing scratches the skin.
- Test the neckline. It must pass easily over a baby’s head. Use a snap or a button-loop back opening for newborns.
Professional Finishing: Wet Blocking and Final Checks
Blocking can dramatically improve lace and scalloped edges. It opens the stitch pattern, evens the hem and helps the garment look intentional rather than freshly pulled from the hook.
- Soak the finished garment in lukewarm water with a mild fiber wash for about 15 minutes, following your yarn’s care instructions.
- Press out excess water gently in a clean towel. Do not wring or twist the garment.
- Lay the dress flat on a suitable blocking surface.
- Shape the neckline, armholes and hem to the intended measurements.
- Pin scalloped points individually when the border is a major design feature.
- Allow the garment to dry completely before removing the pins.
For baby garments, finish by checking every end, button, ribbon and embellishment. Decorative pieces should be securely attached, and any accessory choice should be appropriate for the intended child and use.
Common Crochet Dress Mistakes—and How to Fix Them
1. The yoke is too tight
Check gauge first. If your stitch count per inch is higher than expected, the garment will be smaller. Do not automatically add random stitches; correct the construction based on the actual gauge and intended measurements.
2. The skirt curls upward
Possible causes include too few increases, a tight stitch, or an edging that pulls the fabric inward. Check the fabric before adding the final border.
3. The skirt becomes wavy
This can happen when increases are too frequent or the stitch pattern is naturally expanding. Reduce or redistribute increases while maintaining the stitch repeat.
4. The lace looks different from the inspiration photo
That is normal when yarn weight, hook size and tension change. Stitch structure matters more than color. Make a small swatch and compare the density before committing to the full skirt.
5. The neckline does not sit flat
Count the opening and check your tension. A neckline can ripple when there are too many stitches or pull when there are too few.
For Experienced Crocheters: Turn One Dress Into a Design System
If you have been crocheting for years, the fastest way to create new crochet ideas is to stop thinking in isolated patterns and start thinking in components.
- Yoke library: keep one square-yoke framework, one round-yoke framework and one simple bodice framework.
- Skirt library: collect a solid texture, a shell, a V-stitch, an eyelet and a lace repeat.
- Border library: keep scallops, picots, shells, fans and a clean single-crochet finish.
- Color library: save three-color combinations that you have already tested together.
- Fit notes: record gauge, finished chest, armhole depth, yoke length and skirt length after every successful project.
This modular approach lets you create dozens of original combinations while spending less time reinventing the technical foundation.
FAQ: Crochet Ideas
What are good crochet ideas for beginners?
Start with projects that teach one or two techniques at a time. A simple baby dress with a straightforward bodice, repeated skirt stitch and basic edging can be a useful garment-learning project after you are comfortable with foundational stitches.
What is the easiest crochet dress construction?
A simple top-down construction is practical because you can check the bodice fit before making the skirt. The exact difficulty still depends on the stitch pattern, sleeve design and finishing details.
What yarn is good for crochet baby dresses?
Soft cotton, cotton blends and suitable baby-friendly acrylics are common choices. The right yarn depends on the desired drape, wash requirements, climate and stitch definition. Always check the manufacturer’s care guidance.
How do I make crochet dress ideas fit different sizes?
Start with gauge and target body measurements rather than simply adding rows. Adjust the yoke width and depth first, then calculate the skirt circumference and length from the finished bodice.
Can I change the colors without changing the pattern?
Usually yes, provided the yarn weight and gauge remain compatible. A color change is one of the easiest ways to create a new visual version of an existing design.
How do I make a crochet dress look more professional?
Prioritize even tension, accurate gauge, clean joins, consistent stitch repeats, secure finishing and careful blocking. Professional results are usually more about consistency than adding more decoration.
How much yarn does a crochet baby dress need?
About 250–400 yards of DK cotton for 6–12 months, depending on skirt fullness and stitch pattern. Buy one extra ball from the same dye lot.
Are buttons and ribbons safe on baby clothes?
Only if they are securely attached. For babies under 3, prefer embroidered or crocheted details and short ribbons sewn into a seam.
Keep Exploring Ichraq Crea Crochet Patterns
When you are ready to move from inspiration to printable instructions, explore the Ichraq Crea pattern libraries.
Final thought: the best crochet ideas are not the ones that simply look beautiful on a screen. They are the ones you can understand, adapt and actually finish. Start with the silhouette that matches your skill level, swatch before you commit, check the fit at the yoke, control the skirt expansion, and use finishing details intentionally. Once those fundamentals become second nature, one crochet idea can become dozens of original designs.